1. On your website
1.1 Login
- Login Url
- Email or Username
- Password
1.2 Add Product
- Click WooCommerce > Products > Add Product.
- Enter Title & Description.
- Go to the Product Data panel, Inventory section enter SKU
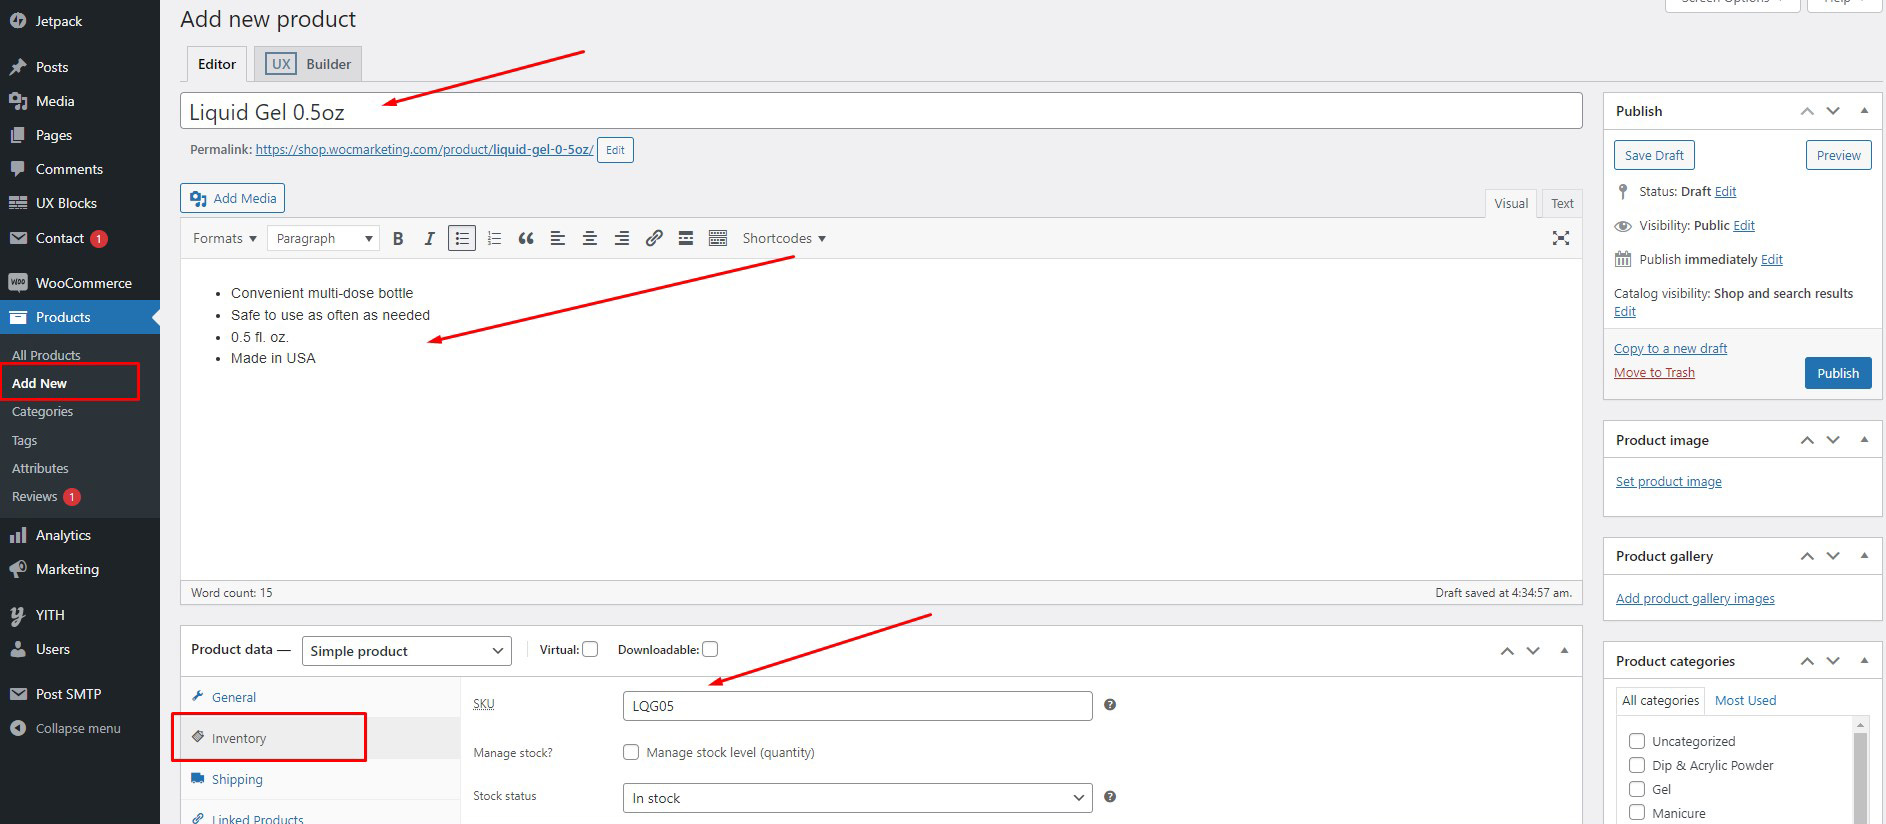
- In the Inventory section, select the stock status in Stock Status or check Manage stock to manage the quantity of products.


- Go to the Product Data panel, General section
- Regular Price – Item’s normal/regular price
- Sale Price – Item’s discounted price that can then be scheduled for certain date ranges.

- Product Image, add a main product image and a gallery of images.
- Publish, click Save
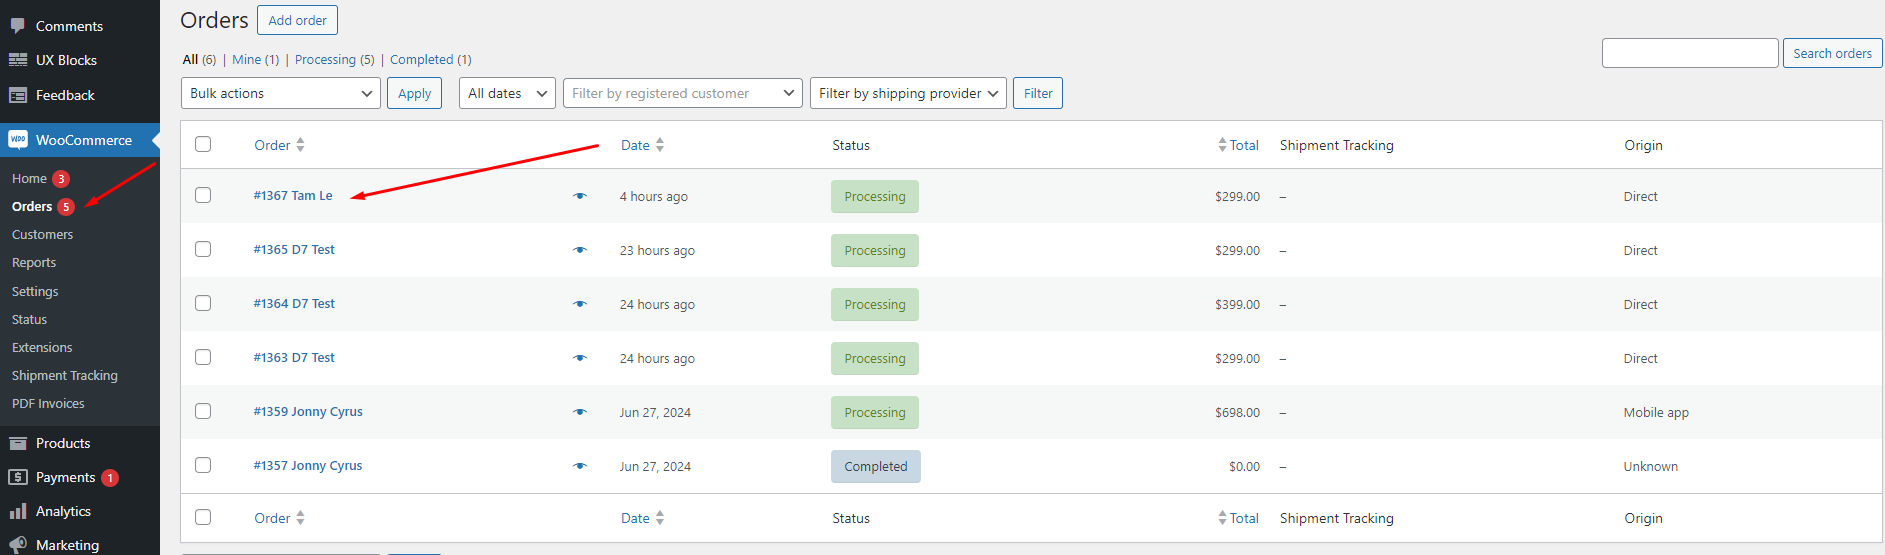
1.3 Order Management
- To manage your orders. Go to WooCommerce > Orders
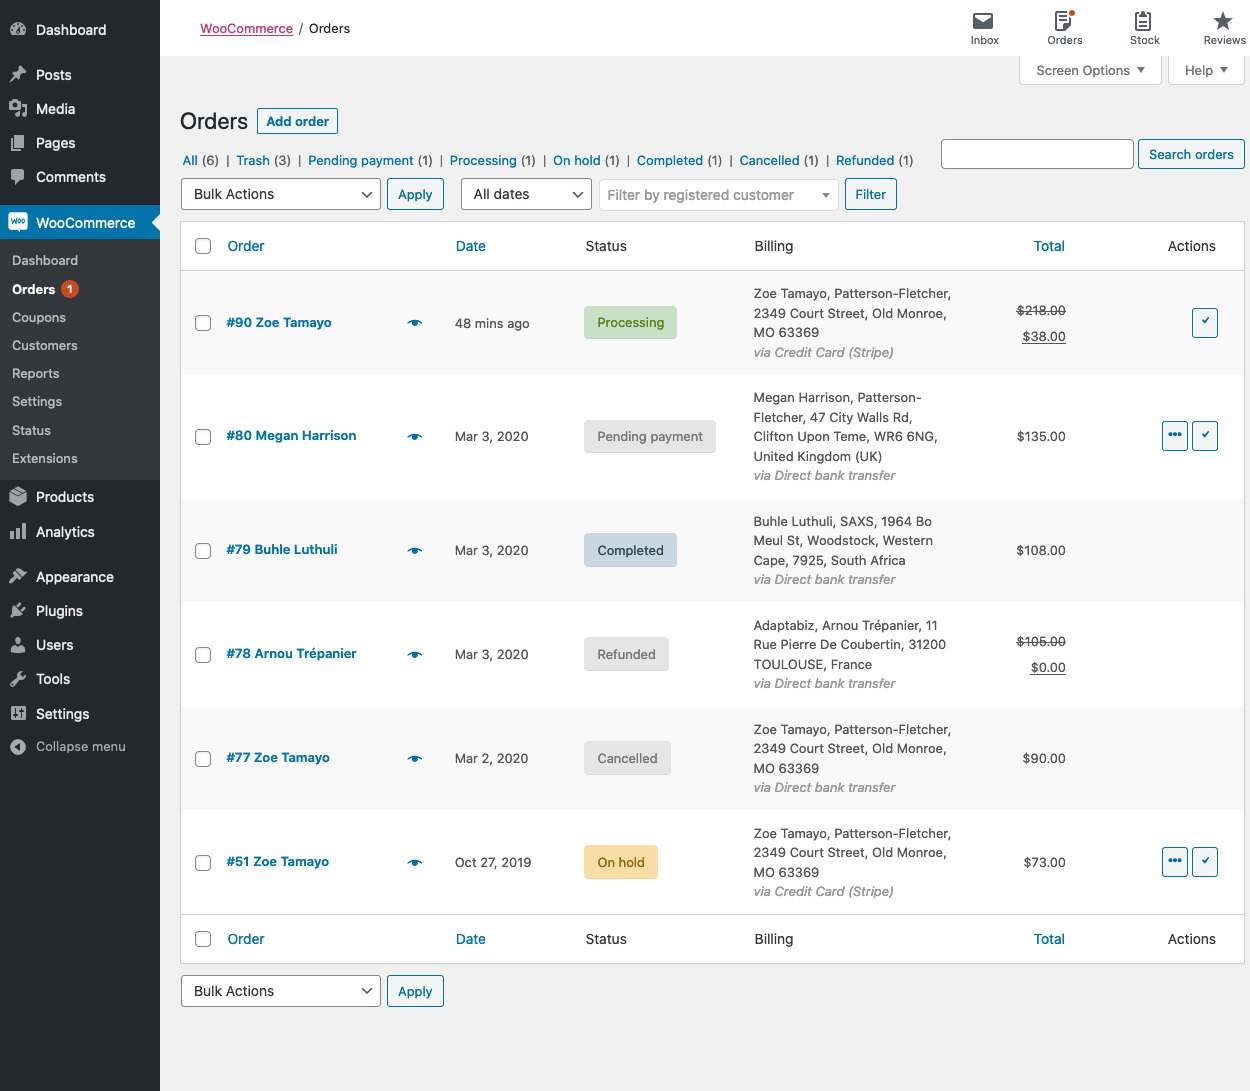
- Click on “Eye” icon to view order details or change order status

1.4 Order Status
- Pending payment — Order received, no payment initiated. Awaiting payment (unpaid).
- Failed — Payment failed or was declined (unpaid) or requires authentication (SCA). Note that this status may not show immediately and instead show as Pending until verified (e.g., PayPal).
- Processing — Payment received (paid) and stock has been reduced; order is awaiting fulfillment. All product orders require processing, except those that only contain products which are both Virtual and Downloadable.
- Completed — Order fulfilled and complete – requires no further action.
- On hold — Awaiting payment – stock is reduced, but you need to confirm payment.
- Canceled — Canceled by an admin or the customer – stock is increased, no further action required.
- Refunded — Refunded by an admin – no further action required.
- Authentication required — Awaiting action by the customer to authenticate the transaction and/or complete SCA requirements.

1.5 Add Tracking Info
- Select the order that you want to add tracking
- Click Add Tracking Info
- Enter Tracking Number, Shipping Provider, Date Shipped
- Click Save Tracking
- The system will automatically send a notification email to the customer with the Tracking Number code
![]()
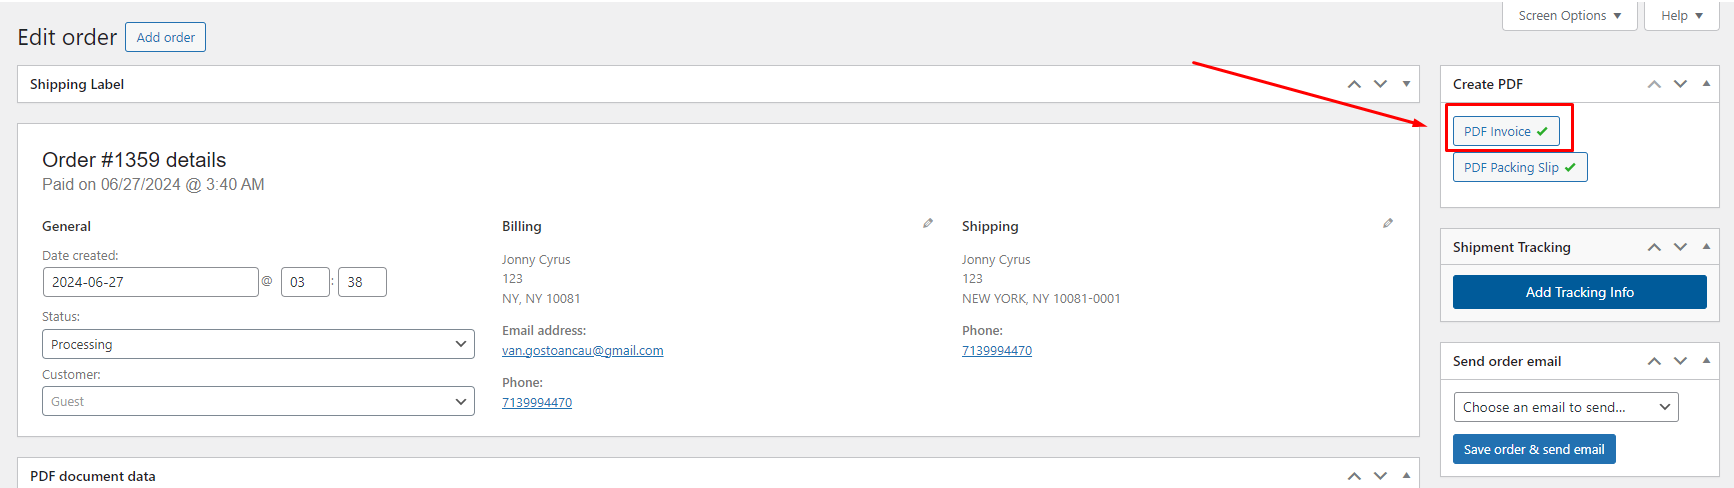
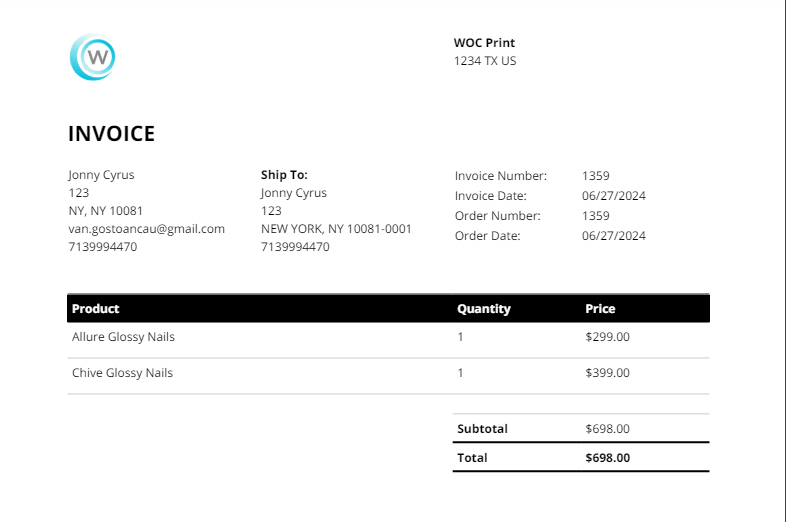
1.6 PDF Invoice
By default, when a customer orders a product on the website, both you and the buyer will receive an email with an attached PDF invoice. To review and print the invoice, you can go to WooCommerce -> Orders -> select the Order you need to print -> Click on PDF Invoice at the right corner.
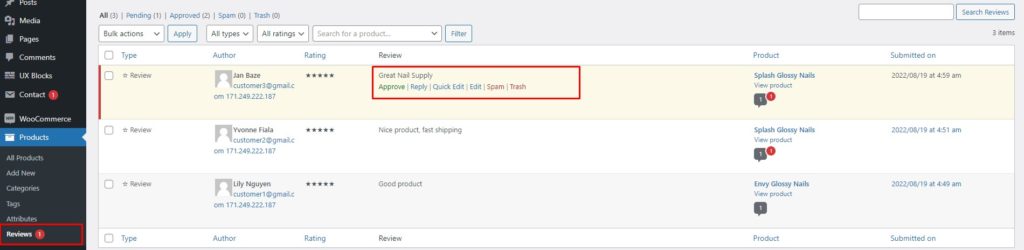
1.7 Review Management
Customers can leave a review for any products on your website, and it only shows on your website when you approve it. You will receive a notification via Email and WooCommerce App when the customer leaves a review. To view Reviews, click Products -> Reviews.
1.8 Refund
You can refund all or part of the orders.
- Select the order that needs to be refunded.
- Select Refund
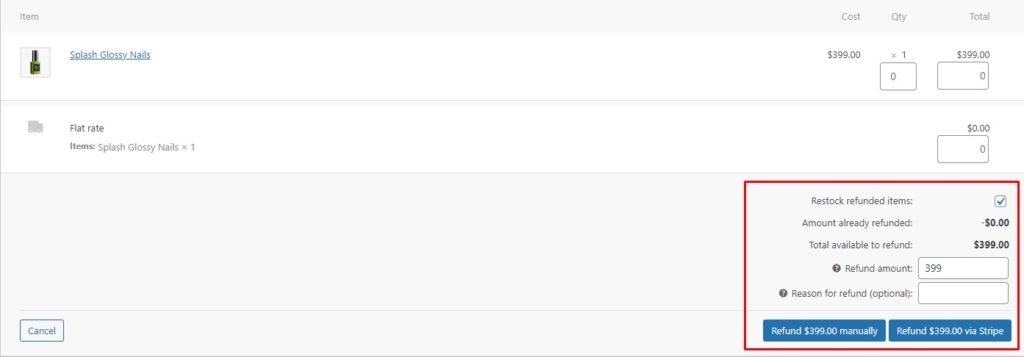
- Enter the amount
- If you choose Refund manually, the system only updates the order history, and you can refund on your own
- If you select Refund via [PAYMENT_GATE], the system will update the order history and automatically refund the customer
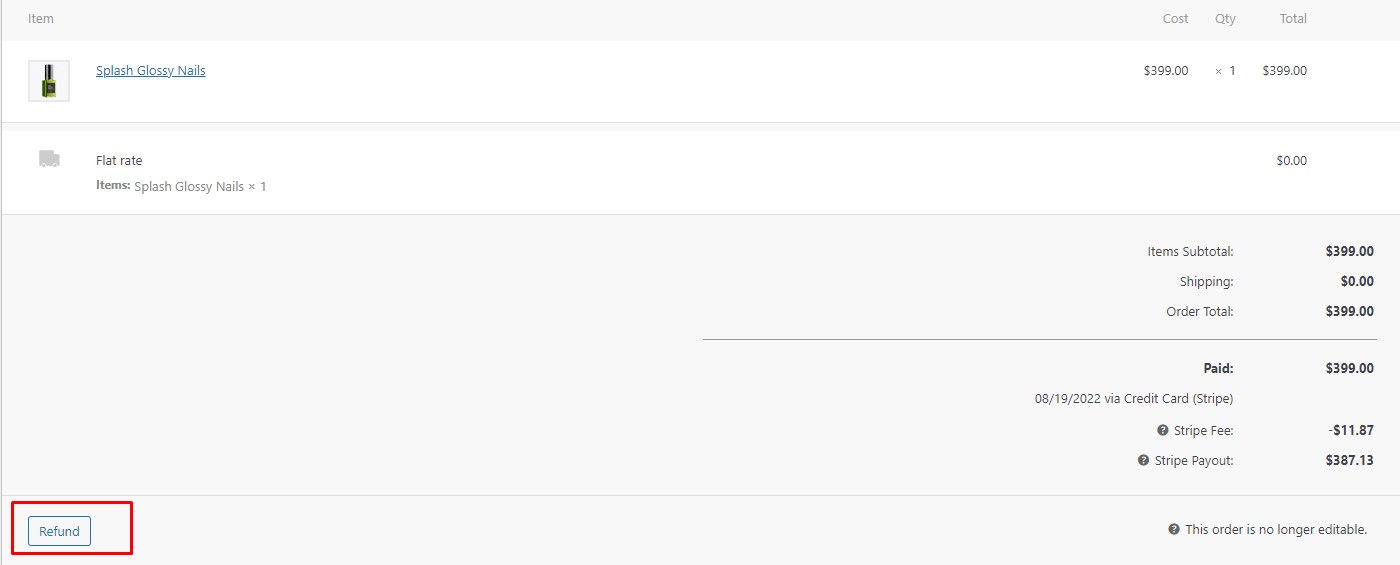
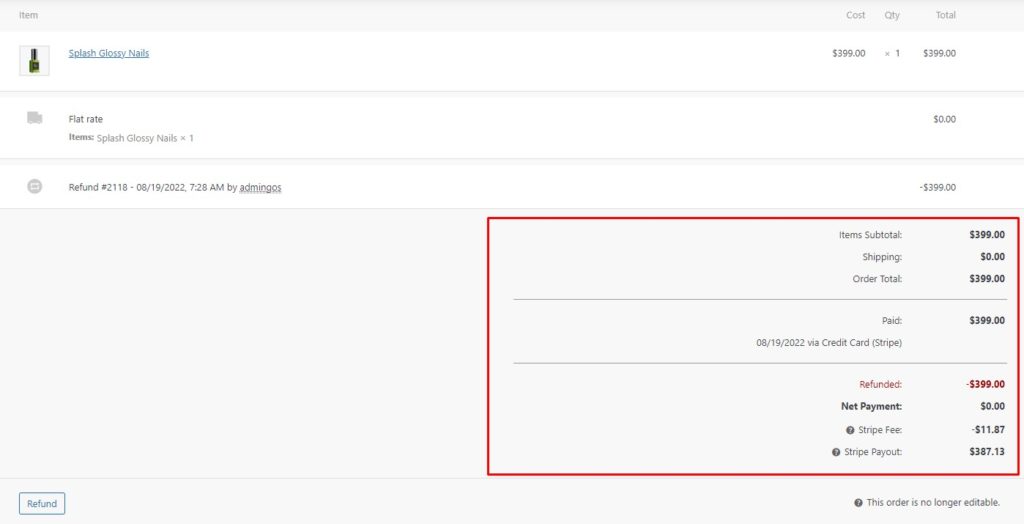
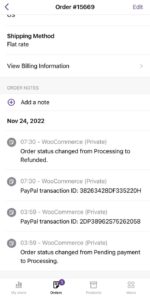
- Tracking the refund status will be updated under the Order Notes section.

1.9 Coupon Management
1.8.1 Creating a coupon
To use coupons with WooCommerce.
- Go to: WooCommerce > Settings > General > Enable coupons
- Tick the checkbox to Enable the use of coupon codes.
- Save Changes.
To Add coupon code and description
- Go to: Marketing > Coupons > Add coupon. Or hover over an existing one to Edit.
- A fresh installation of WooCommerce will show you an initial screen to create a coupon or to learn more.
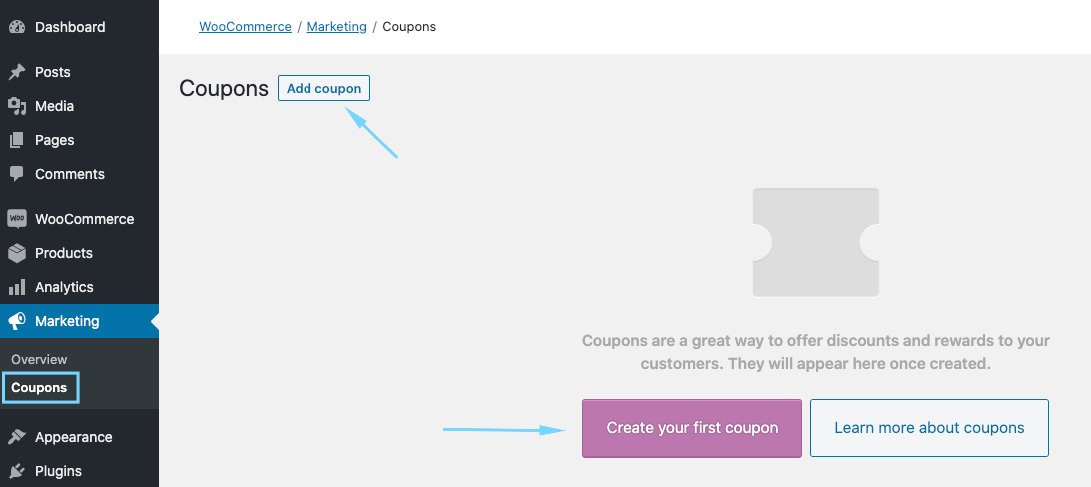
- Existing stores start on the Coupons screen.
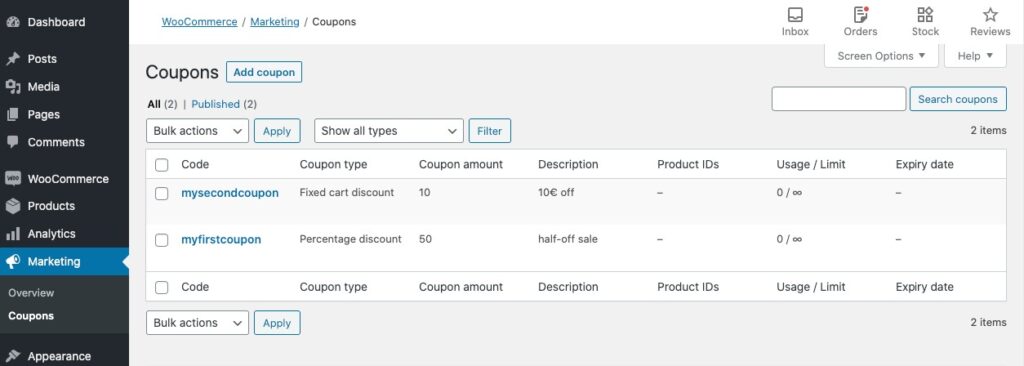
- Enter or generate a Coupon Code. The code is used by the customer to apply the coupon and associated discount. Must be unique as it’s used as an identifier.
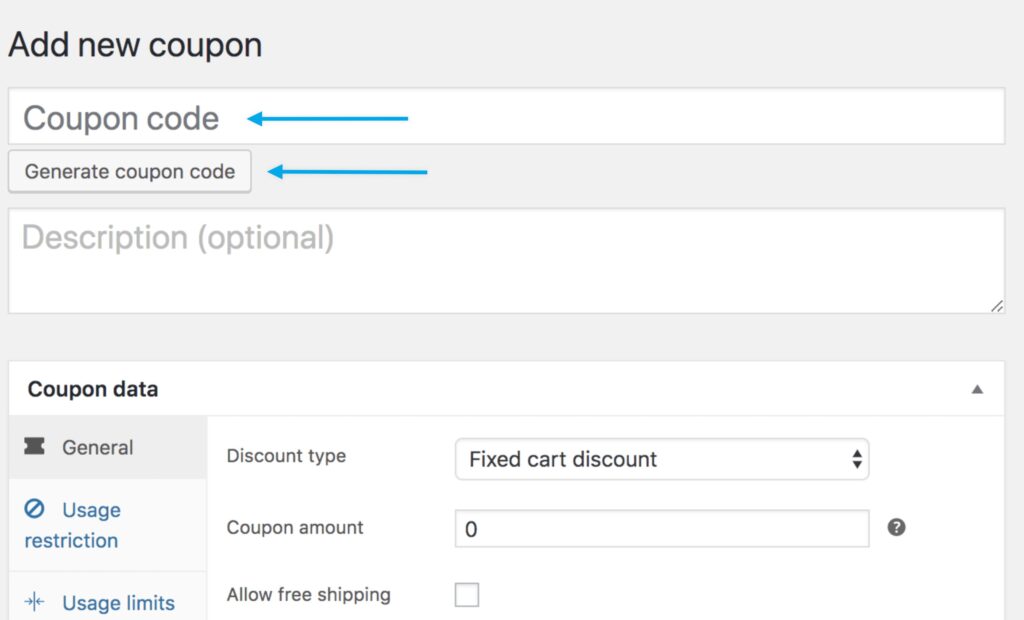
- Enter a Description (optional) — Info about the coupon for internal use. For example: Name of promotion/event, dates in effect, compensation, ticket number, customer name.
Under Coupon Data, there are three sections you can use to add restrictions and limits for the coupon: General, Usage Restriction, and Usage Limits.
1.8.2 General
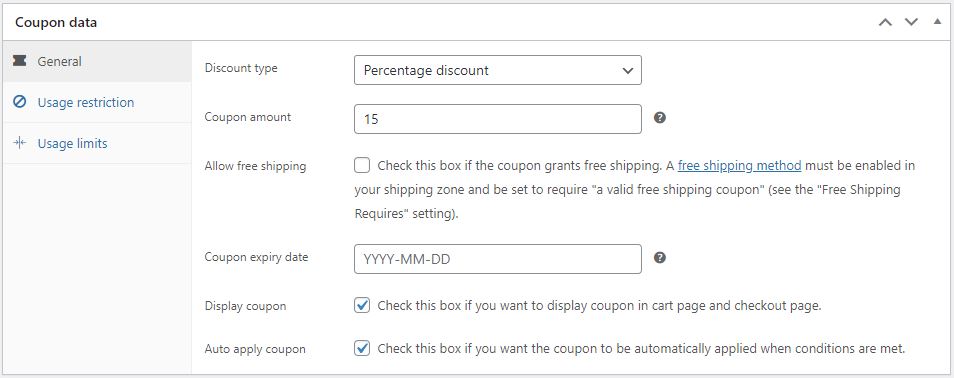
Discount type:
- Percentage discount – A percentage discount for selected products only. For example, if the cart contains three (3) t-shirts @ $20 each = $60, a coupon for 10% off applies a discount of $6.
- Fixed cart discount – A fixed total discount for the entire cart. For example, if the cart contains three (3) t-shirts @ $20 each = $60, a coupon for $10 off gives a discount of $10.
- Fixed product discount – A fixed total discount for selected products only. Customer receives a set amount of discount per item. For example, three (3) t-shirts @ $20 each with a coupon for $10 off applies a discount of $30.
Coupon amount – Fixed value or percentage, depending on discount type you choose. Entered without a currency unit or a percent sign, which are added automatically, e.g., Enter ’10’ for £10 or 10%.
Allow free shipping – Removes shipping cost when coupon is used. Requires Free Shipping to be enabled.
Coupon expiry date – Date the coupon should expire and can no longer be used.
Display coupon – Check this box if you want to display coupon in cart page and checkout page.
Auto apply coupon – Check this box if you want the coupon to be automatically applied when conditions are met.
1.8.3 Usage Restriction
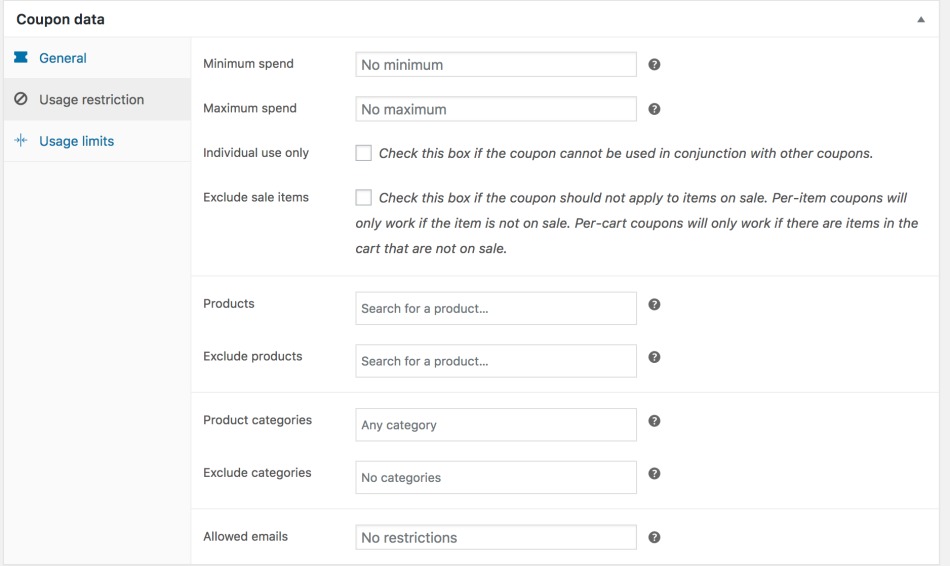
- Minimum spend – Allows you to set the minimum subtotal needed to use the coupon. Note: The sum of the cart subtotal + tax is used to determine the minimum amount.
- Maximum spend – Allows you to set the maximum subtotal allowed when using the coupon.
- Individual use only – Tick the box if you don’t want this coupon to be used in combination with other coupons.
- Exclude sale items – Tick the box if you don’t want this coupon to apply to products on sale. Per-cart coupons do not work if a sale item is added afterward.
- Products – Products that the coupon will be applied to, or that need to be in the cart in order for the fixed or percentage discount to be applied.
- Exclude products – Products that the coupon will not be applied to, or that cannot be in the cart in order for the “Fixed cart discount” to be applied.
- Product categories – Product categories that the coupon will be applied to, or that need to be in the cart in order for the fixed or percentage discount to be applied.
- Exclude categories – Product categories that the coupon will not be applied to, or that cannot be in the cart in order for the “Fixed cart discount” to be applied.
- Allowed Emails/Email restrictions – Email address or addresses that can use a coupon. Verified against customer’s billing email.
1.8.4 Usage Limits
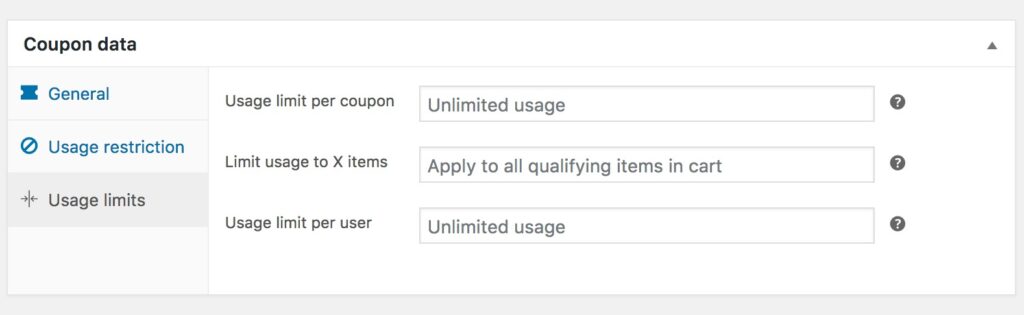
- Usage limit per coupon – How many times a coupon can be used by all customers before being invalid.
- Limit usage to X items – How many items the coupon can be applied to before being invalid. This field is only displayed if there is one or more products that the coupon can be used with, and is configured under the Usage Restrictions.
- Usage limit per user – How many times a coupon can be used by each customer before being invalid for that customer.
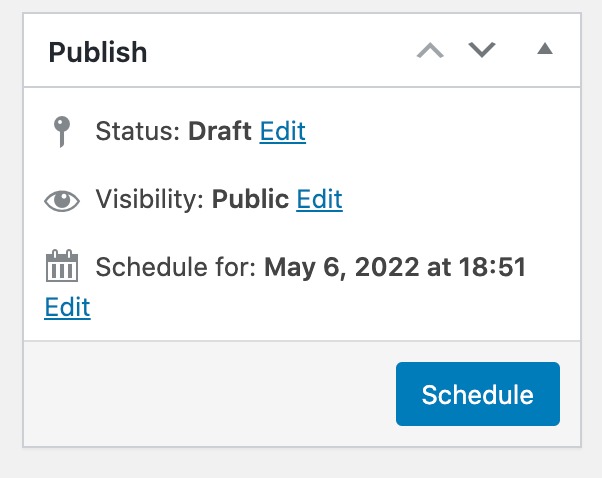
Once you’ve configured all settings, select Publish and your coupon is ready to use.
If you do not want the coupon to be immediately available, you can schedule it to become available on a future date/time using the option in the Publish settings:
1.10 Theme Settings
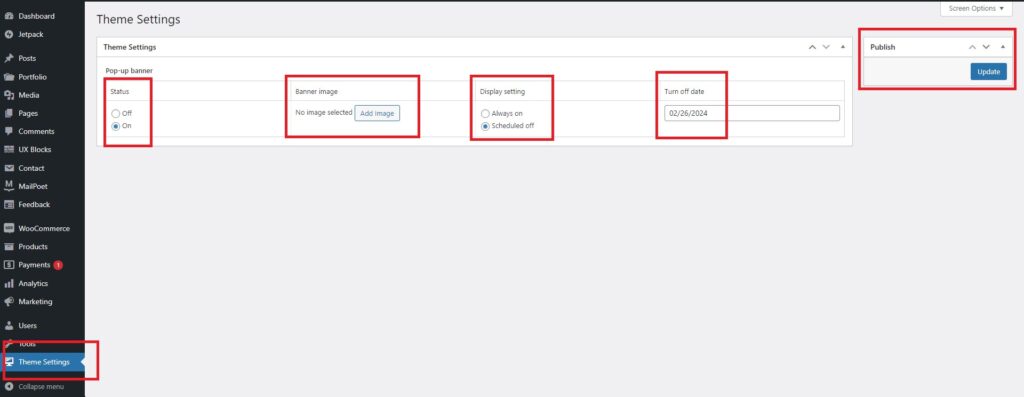
1.10.1 Pop-up banner
To display pop-up banner on website:
- Go to: Theme Settings.
- Choose On at the Status column to enable the pop-up banner feature.
- Click the Add image button to select the image you want to display or upload a new image.
- At the Display setting column, you can choose Always on if you do not want to set turn off date for your pop-up banner. Otherwise, choose scheduled off and Turn off date column will be showed then you can enter Turn off date for your pop-up banner.
- Click Update to save changes.
1.11 Update Menus
To update menus on website:
- Go to the Menus (1) under Appearance
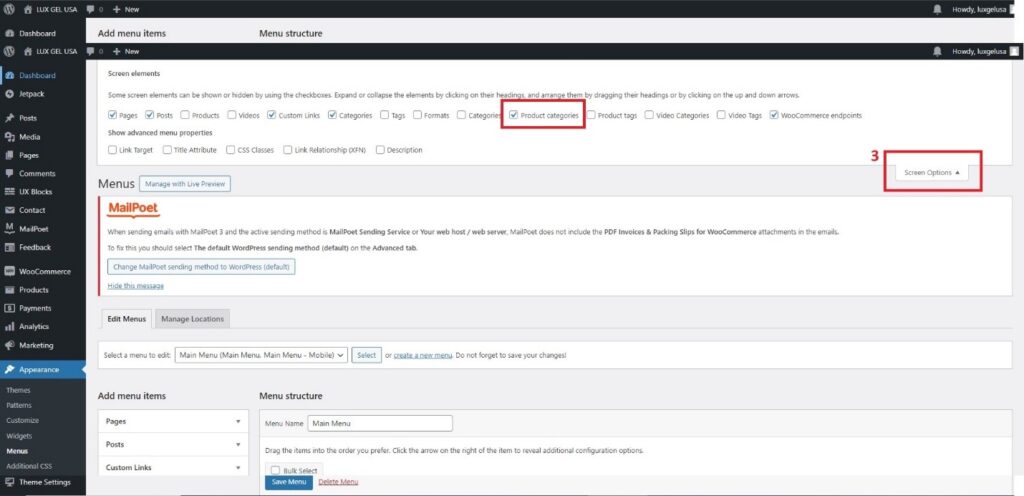
- Check the categories you want to add to the Menu in the Product categories (2) tab
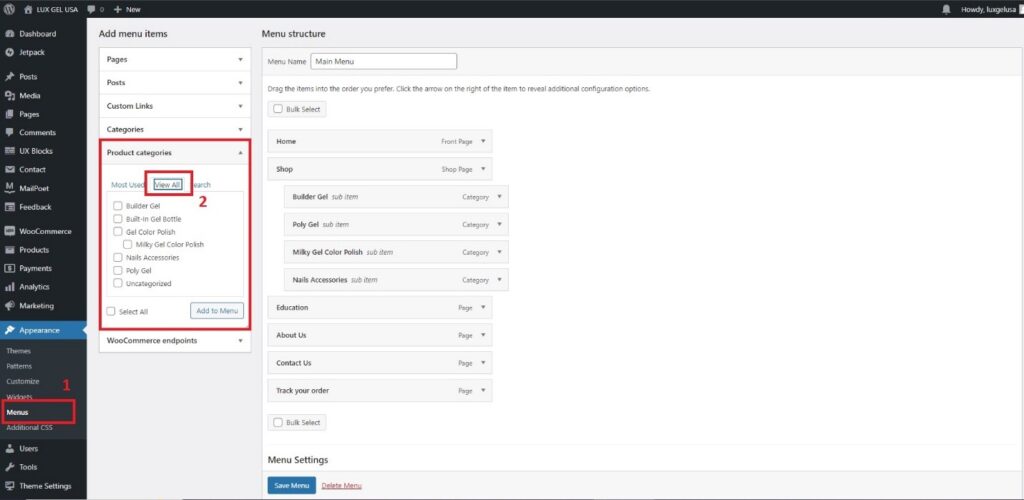
Note: If you can’t find the Product categories tab, scroll up and look for the Screen Options (3) at the top. Click on Screen Options to open the hidden elements box, check the option to display Product categories, and then follow step 2.
- After selecting the categories, click the Add to Menu (4) button
- Click and hold the left mouse button to drag and drop the category to the desired position (5)
Note: Pay attention to the category levels in the Menu. For example, in the image below, Builder Gel and Poly Gel are sub-items of Shop, and Poly Gel contains two other sub-items: Milk Gel Color Polish and Nails Accessories.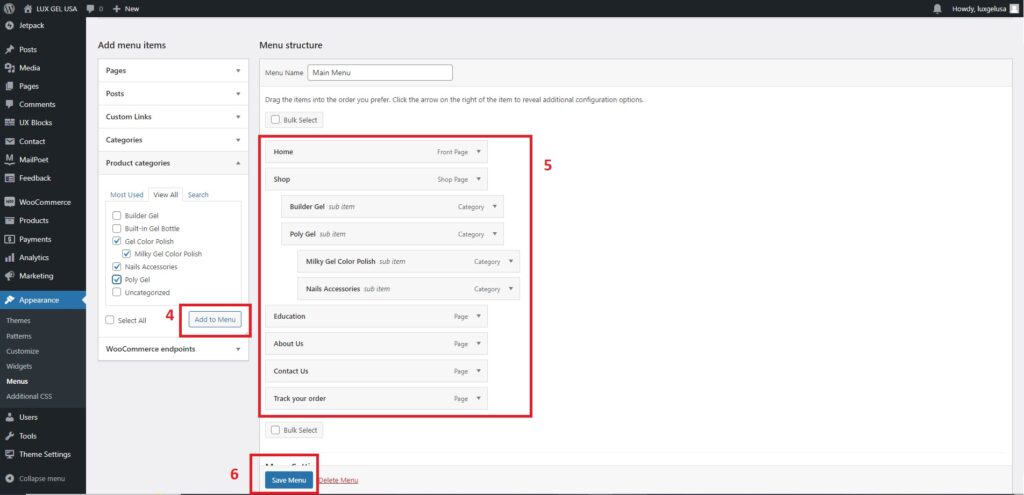
- Click the Save Menu (6) button.
2. On Mobile Application
Display images are from iOs. If you use an Android, some of the interface might be different.
2.1 Login
Download WooCommerce Mobile App and login with the account that we provided.
- iOS: https://apps.apple.com/us/app/id1389130815
- Android: https://play.google.com/store/apps/details?id=com.woocommerce.android

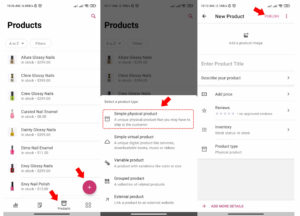
2.2 Add Product
- Click Product ion on Menu
- Select product type
- Enter product information and click Publish
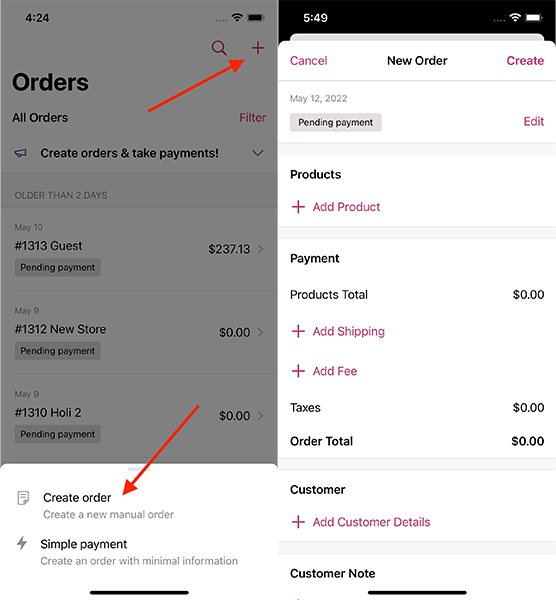
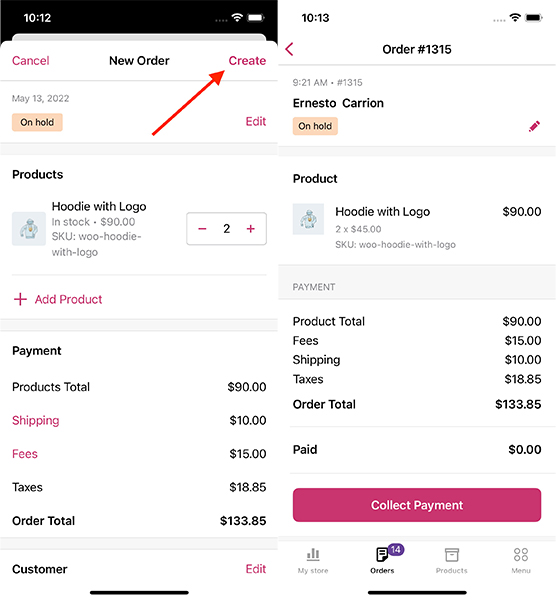
2.3 Create Order
Follow these steps to create an order:
- Go to the Orders tab at the bottom
- Tap on the “+” icon on the Orders tab
- Tap Create Order
- The New Order screen will appear
Order Status
- Click on the order that you want to make change
- Tap Edit/Pencil Icon
- Select status of your order then tap the Apply

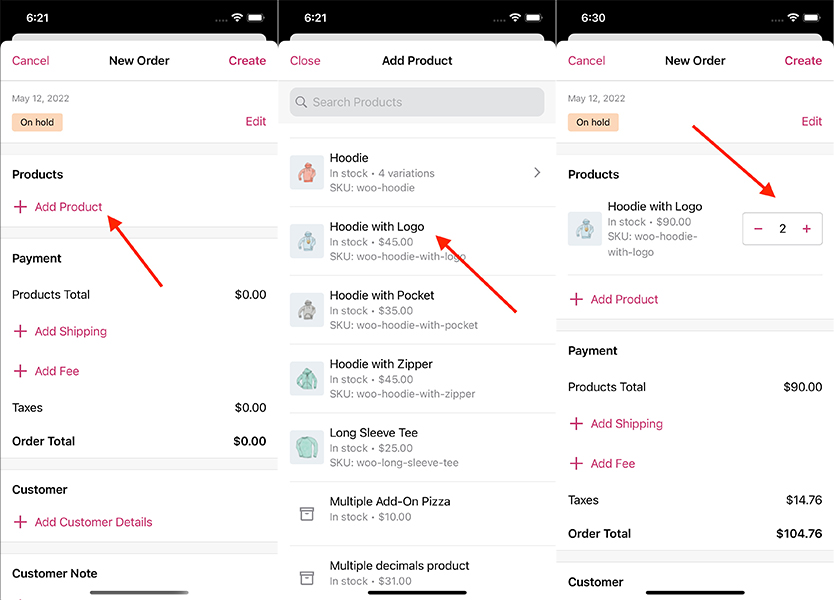
Adding Products
- Tap the + Add Product button in the Products section
- Tap on the product that you want to add
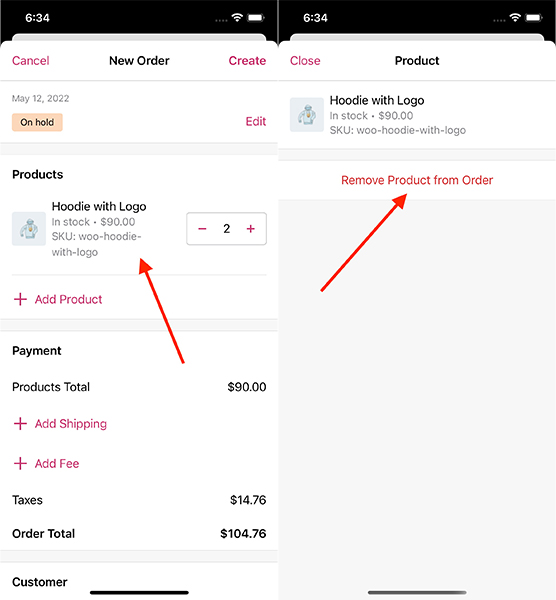
Removing a Product
- Tap the product you want to remove
- Tap Remove Product from Order
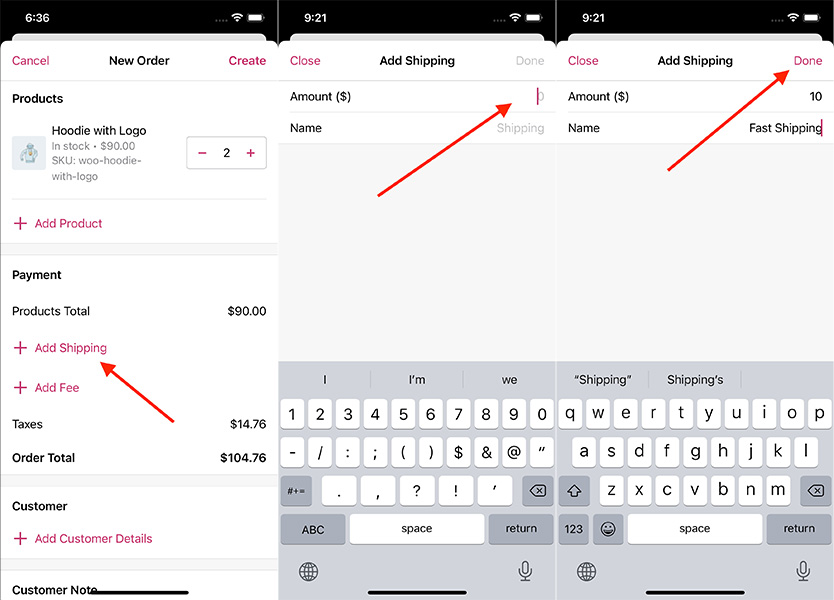
Add Shipping Fee
- On the Payments section, tap + Add Shipping
- Enter shipping fee a
- Tap Done button to save the change
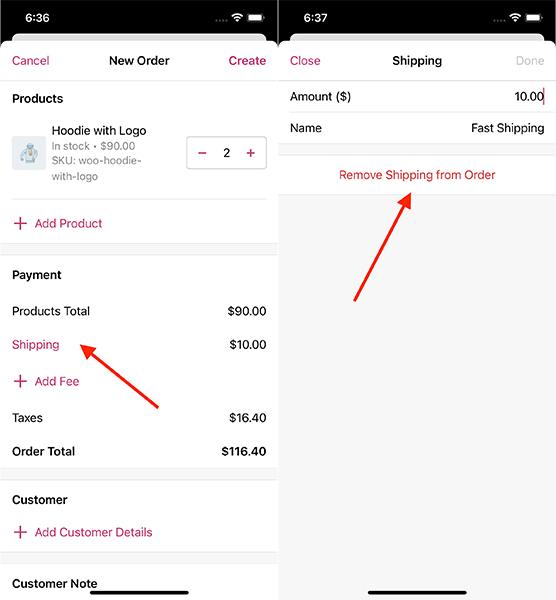
Delete Shipping Fee
- On the Payments section, tap Shipping
- Tap Remove Shipping from Order
Add Customer Details
- On the Customer section, tap + Add Customer Details
- Fill in the information
- If the shipping address is a different billing address, turn on Add a different shipping address
- Tap Done to save the changes

Complete a Order
- After fulfill all information, you can tap the Create located at the top right to finish
- After the order is created, you will be redirected to the order details screen where you can take the necessary actions to fulfill the order
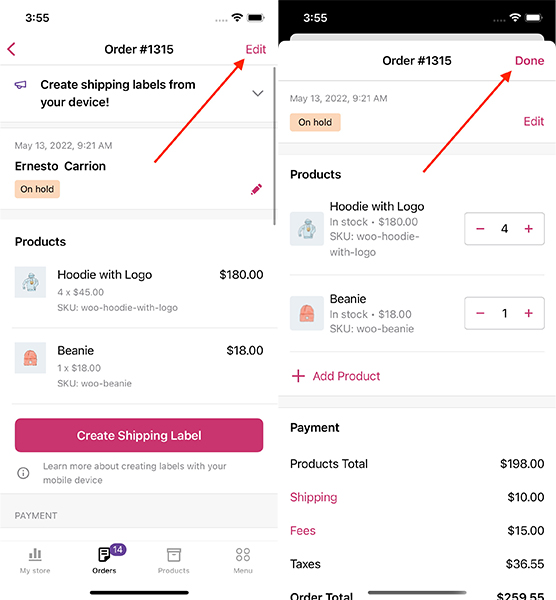
Edit Order
- On the Orders tab, click on an order that you want to edit
- Tab Edit to make changes
- Tap Done to save
2.4 Add Tracking Info
- On the Orders tab, select the order that you want to add tracking
- Click Mark order complete
- Click Add Tracking, enter tracking info click ADD
- Click Mark order complete
![]()
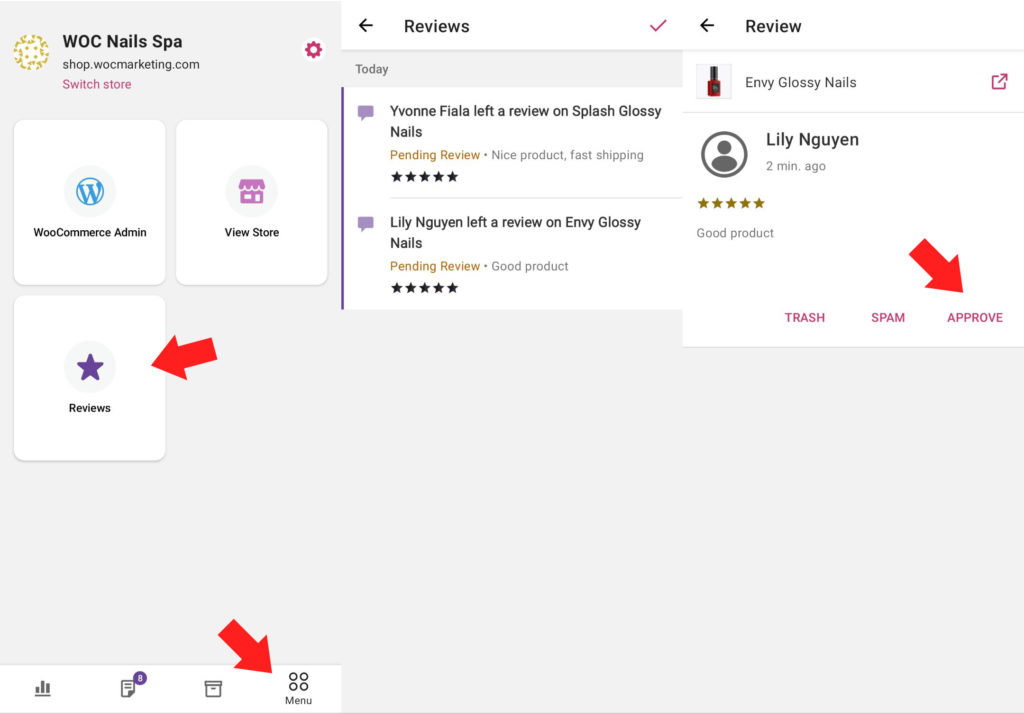
2.5 Review Management
- Select Menu
- Select Reviews
- Click on any review to see details
- Select Approve to accept and publish reviews on your website
2.6 Refund
- On the Orders tab, select the order that you want to refund
- Select Issue refund
- Enter the quantity of each product or click Select All
- Select Next
- Select Refund
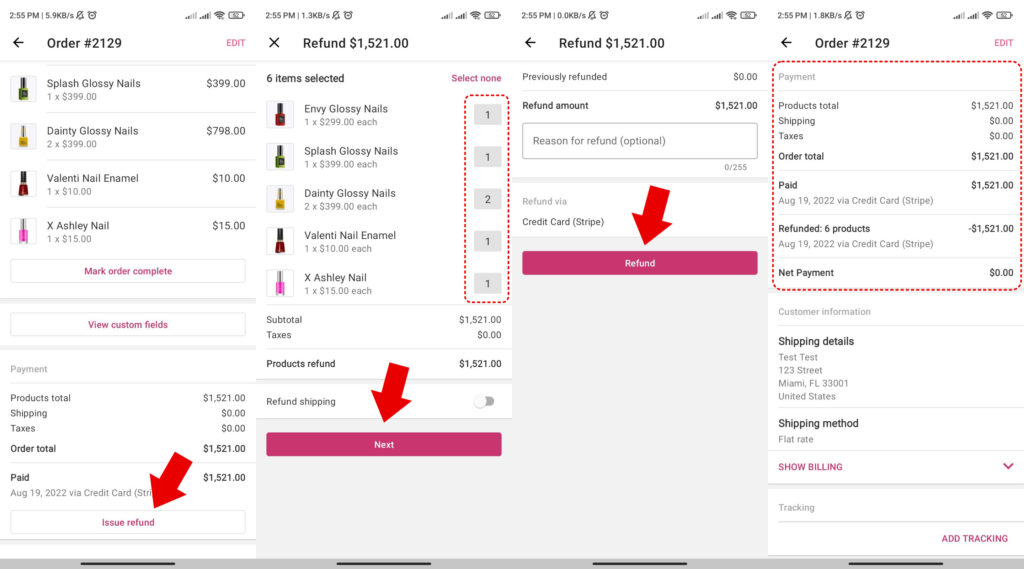
- Tracking the refund status will be updated under the Order Notes section